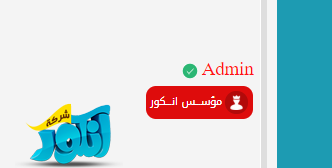
اقدم لكم طريقة جديدة لعرض القاب الاعضاء في منتديات الـ VBulletin
خلفية مع صورة بجانب اللقب
باستخدام اكواد الـ css
مثال على الكود


طريقة التركيب :
اولا حبيت انوه انه الكود يشتغل فقط على الاستايلات اللي تضع فيها الـ css
يعني كل استايل بدك يشتغل فيه بدك تفوت يدويا تركب الاكواد
اولا :
ندخل لوحة التحكم - التحكم بالاستايلات - ورقة css - والصندوق اللي بالاعلى css اضافي ضع به الاكواد التالية
CODE
.rr {
    background: #de0c0c;
    color: #FFF;
    border-radius: 10px;
    padding: 5px;
    width: 90%;
    margin: 0 auto;
    text-align: center;
    display: block;
}
.rr:before {
    background: url(images/rr/ad.png) no-repeat 50% 50% rgba(0,0,0,0.2);
    background-size: 15px !important;
    border-radius: 100%;
    content: "";
    display: inline-block;
    height: 23px;
    margin-left: 3px;
    vertical-align: text-top;
    width: 23px;
}

.rr1 {
    background: #3d52f5;
    color: #FFF;
    border-radius: 10px;
    padding: 5px;
    width: 90%;
    margin: 0 auto;
    text-align: center;
    display: block;
}
.rr1:before {
    background: url(images/rr/sm.png) no-repeat 50% 50% rgba(0,0,0,0.2);
    background-size: 15px !important;
    border-radius: 100%;
    content: "";
    display: inline-block;
    height: 23px;
    margin-left: 3px;
    vertical-align: text-top;
    width: 23px;
}
.rr2 {
    background: #179c1a;
    color: #FFF;
    border-radius: 10px;
    padding: 5px;
    width: 90%;
    margin: 0 auto;
    text-align: center;
    display: block;
}
.rr2:before {
    background: url(images/rr/tm.png) no-repeat 50% 50% rgba(0,0,0,0.2);
    background-size: 15px !important;
    border-radius: 100%;
    content: "";
    display: inline-block;
    height: 23px;
    margin-left: 3px;
    vertical-align: text-top;
    width: 23px;
}
.rr3 {
    background: #9c1785;
    color: #FFF;
    border-radius: 10px;
    padding: 5px;
    width: 90%;
    margin: 0 auto;
    text-align: center;
    display: block;
}
.rr3:before {
    background: url(images/rr/tm.png) no-repeat 50% 50% rgba(0,0,0,0.2);
    background-size: 15px !important;
    border-radius: 100%;
    content: "";
    display: inline-block;
    height: 23px;
    margin-left: 3px;
    vertical-align: text-top;
    width: 23px;
}
.rr4 {
    background: #000000;
    color: #FFF;
    border-radius: 10px;
    padding: 5px;
    width: 90%;
    margin: 0 auto;
    text-align: center;
    display: block;
}
.rr4:before {
    background: url(images/rr/nm.png) no-repeat 50% 50% rgba(0,0,0,0.2);
    background-size: 15px !important;
    border-radius: 100%;
    content: "";
    display: inline-block;
    height: 23px;
    margin-left: 3px;
    vertical-align: text-top;
    width: 23px;
}
.rr5 {
    background: #4d2902;
    color: #FFF;
    border-radius: 10px;
    padding: 5px;
    width: 90%;
    margin: 0 auto;
    text-align: center;
    display: block;
}
.rr5:before {
    background: url(images/rr/m.png) no-repeat 50% 50% rgba(0,0,0,0.2);
    background-size: 15px !important;
    border-radius: 100%;
    content: "";
    display: inline-block;
    height: 23px;
    margin-left: 3px;
    vertical-align: text-top;
    width: 23px;
}
.rr6 {
    background: #024d4a;
    color: #FFF;
    border-radius: 10px;
    padding: 5px;
    width: 90%;
    margin: 0 auto;
    text-align: center;
    display: block;
}
.rr6:before {
    background: url(images/rr/gm.png) no-repeat 50% 50% rgba(0,0,0,0.2);
    background-size: 15px !important;
    border-radius: 100%;
    content: "";
    display: inline-block;
    height: 23px;
    margin-left: 3px;
    vertical-align: text-top;
    width: 23px;
}
.rr7 {
    background: #3d3d3d;
    color: #FFF;
    border-radius: 10px;
    padding: 5px;
    width: 90%;
    margin: 0 auto;
    text-align: center;
    display: block;
}
.rr7:before {
    background: url(images/rr/im.png) no-repeat 50% 50% rgba(0,0,0,0.2);
    background-size: 15px !important;
    border-radius: 100%;
    content: "";
    display: inline-block;
    height: 23px;
    margin-left: 3px;
    vertical-align: text-top;
    width: 23px;
}
ثانيا :
وبعد تركيبه كل ما عليك فقط التوجه الى مكان الالقاب او الالقاب الاضافية في ملفات الاعضاء او لقب العضو بكل مجموعة واضافة الكود التالي
CODE
<span class="rr2">مشرف متخصص</span>
طبعا موجود بالكود 7 اشكال يمكن زيادة عبر نسخ الكود بالمسمى
rr و rr:before
وتغيير الوسم وتغييره ايضا بكود اللقب عشان يتجاوب مع الـ css
وموجود بالكود 7 الوان يمكنك تغييرها عن طريق تغيير الوسم rr واضافة الارقام الموجودة بالكود عليه من 2-7
ويمكنك تغيير الايقونة بجانب اللقب من خلال روابط الصور الموجودة بالكود

هيك بكون أتممت الشرح كامل
يرجى ذكر المصدر عند النقل
لمشاهدة الروابط يلزمك التسجيل
بالتوفيق للجميع
والسلام ختام